User Manual
SOP Maker
Build, control, authorise and print your Standard Operating Procedures.
SOP Maker is an offline, folder-based tool for building, controlling and printing authorised Standard Operating Procedures. Your data stays in a folder you choose on your own computer. There is no server, no account and no internet connection needed once the page has loaded.
It is a controlled-document tool. Every SOP moves through the usual stages, from Draft to Review to Approved, and carries the details an auditor expects to see: who prepared it, who authorised it, the revision number and the dates.
Before you start
SOP Maker uses a modern browser feature that lets a web page read and write files in one folder that you pick. Because of that, a few things matter before you begin.
- Use a desktop computer running Google Chrome or Microsoft Edge. The folder features do not work in Firefox, Safari, or on phones and tablets.
- You can still open, view and print an already-issued SOP on any device. You just cannot author or save from those devices.
- You will connect one folder, named
DATA_TO_CONNECT, where everything is saved: your SOPs, your settings, your images and your printable files. sopmaker.ukis a page describing what the tool does. The tool itself is atsopmaker.uk/app, so bookmark that address.
Getting started
When you open SOP Maker you see a welcome screen with three ways in. Pick the one that matches where you are.
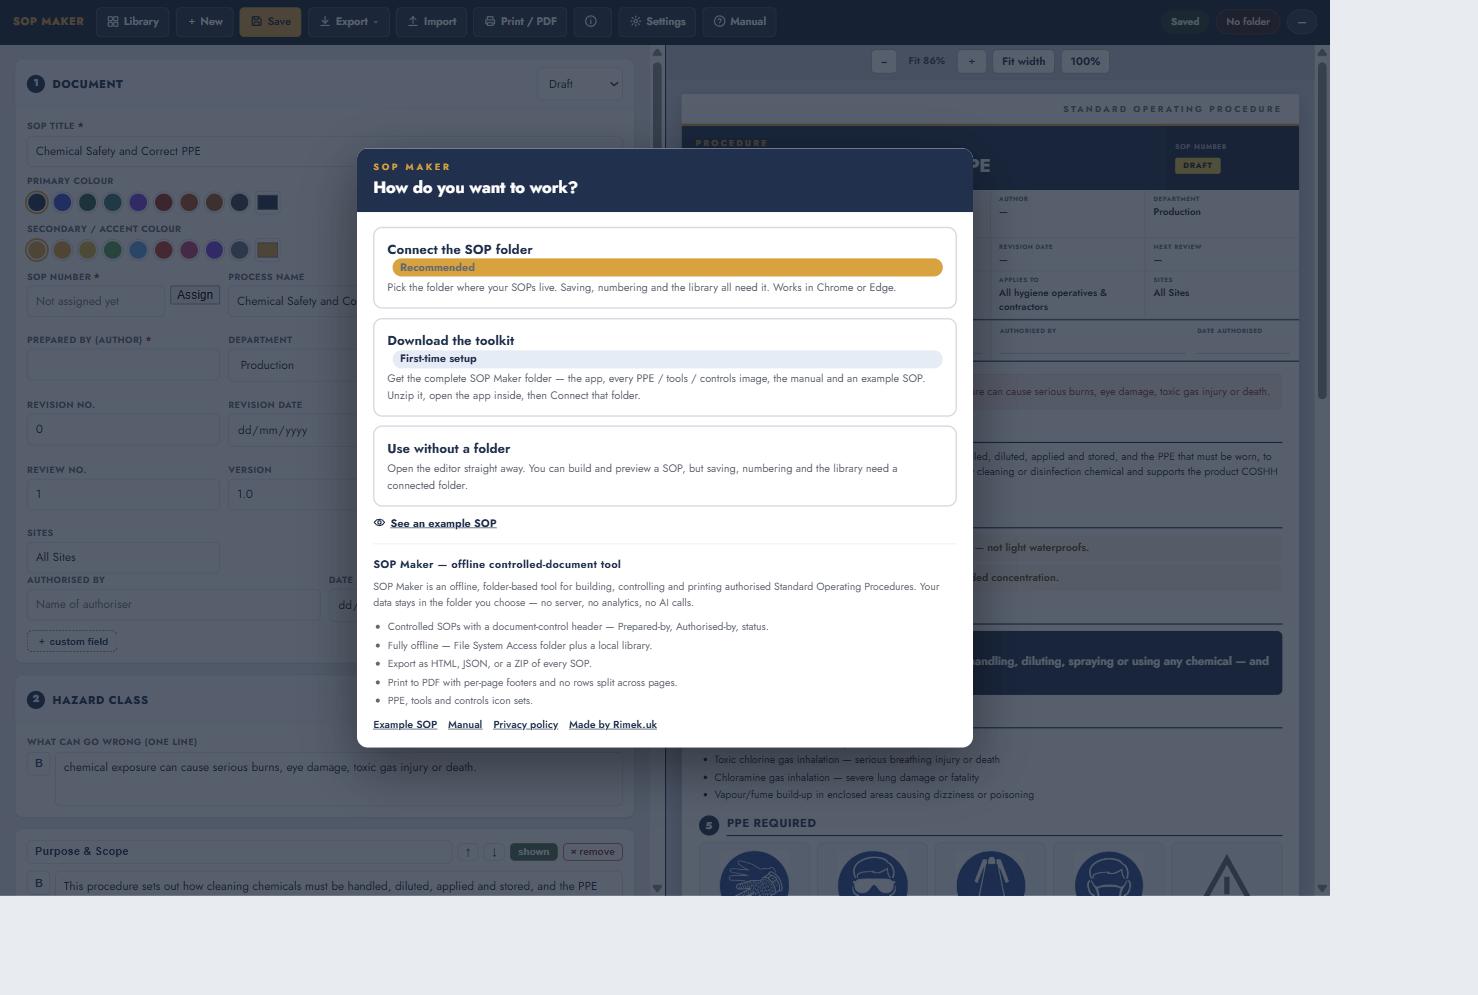
- Connect the SOP folder (recommended). Choose your existing
DATA_TO_CONNECTfolder and pick up where you left off. Everything you save goes here. - Download the toolkit (first time only). Get the whole folder ready to use. Unzip it somewhere sensible, then come back and connect it.
- Use without a folder. Try the tool out and see how it works. You can build an SOP, but saving and the Library need a connected folder.
There is also a See an example SOP link on the welcome screen if you just want to see what a finished document looks like.
First-time setup
The first time you connect a fresh folder, a short setup card appears. It asks for a few basics so your SOPs look like your own from the very first one:
- Your company name.
- An optional logo.
- Your brand colours, or one of the ready-made presets.
- A chance to confirm your departments.
None of this is permanent. You can change all of it later in Settings, so it is fine to accept the defaults and move on.
Branding your SOPs (Settings)
Settings is where you control how every SOP looks. Open it to set your company details and colours.
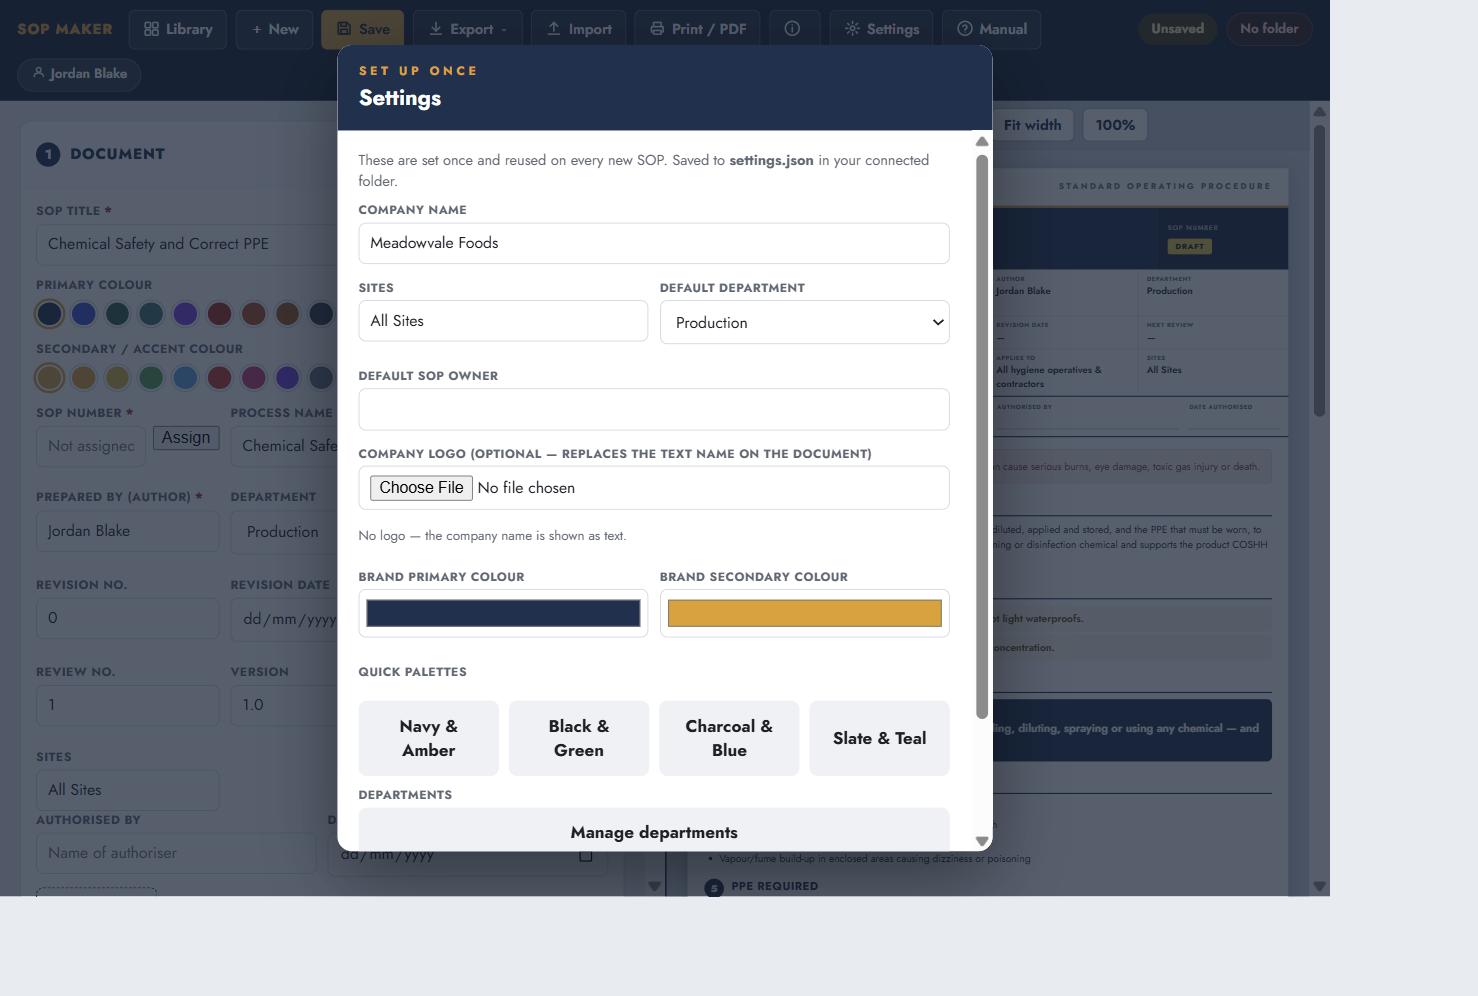
- Company name. Shown on every SOP. If you upload a logo, the logo replaces the text.
- Brand colours. Choose a primary and secondary colour, or use one of the quick palettes: Navy & Amber, Black & Green, Charcoal & Blue, or Slate & Teal.
- Default department and default SOP owner. These pre-fill for you each time you start a new SOP.
Good to know: the safety and hazard colours are fixed and never change with your brand, so a Critical hazard always looks Critical. If you pick a very pale brand colour, it is darkened automatically so the text on it stays readable.
Adding a QR code
If you keep a copy of your SOPs online — on SharePoint, an intranet, or any web address — you can print a QR code in the header so anyone holding the paper copy can open the online one on their phone.
It is off unless you turn it on. Leave it alone and your SOPs look exactly as they always have.
- Open an SOP and look in the Document card, under the colour pickers.
- Tick Show a QR code in the header, then paste the web address of the online copy.
- The code appears in the coloured header bar, on the right, in your own brand colours.
Keep the address short. The longer the web address, the more detail has to be squeezed into the same small square, and past a point it stops scanning reliably on paper. SOP Maker measures this for you: if an address is too long it tells you so and prints no code at all, rather than printing one that looks fine and does not work. A full SharePoint document address is usually too long — a short redirect link works well.
SOP Maker cannot check that the link works. It has no way to know whether the page is really there, so if the online copy moves or is never published, the code will still print and will lead nowhere. Scan it once yourself after you set it up.
If you still use an older copy of SOP Maker somewhere: it can open a document that has a QR code, but it does not know what the code is. If someone saves the document from that older copy, the code and its link may be lost and you would need to set them again.
Departments & numbering
Every SOP belongs to a department. The department does two useful jobs for you: it decides the SOP number, and it decides which folder the printable file is saved in.
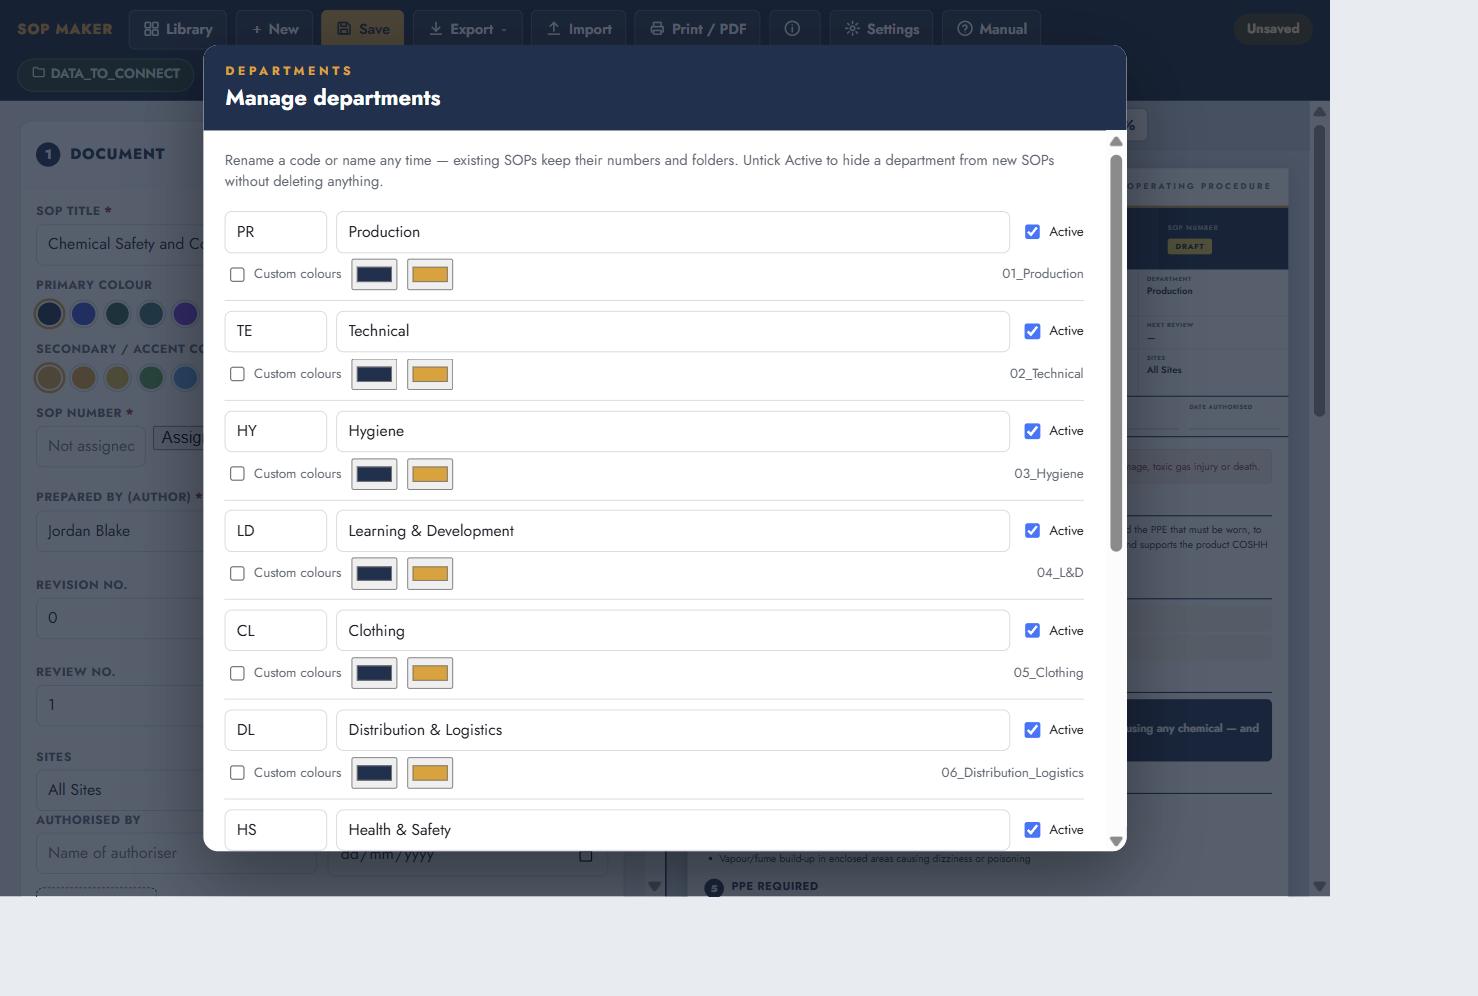
Numbers are automatic and count up on their own within each department. For example, Hygiene SOPs are numbered SOP_HY_0001, SOP_HY_0002 and so on, while Production SOPs run SOP_PR_0001 upward. You never have to track the next number by hand.
In Manage departments you can:
- Rename a department code or name. Existing SOPs keep their numbers and their folders.
- Add your own department.
- Untick Active to hide a department you are not using, without deleting anything.
Creating an SOP
Click + New, choose a department, then pick a starting format or template. You fill in the document on the left, and the finished SOP updates live on the right as you type.
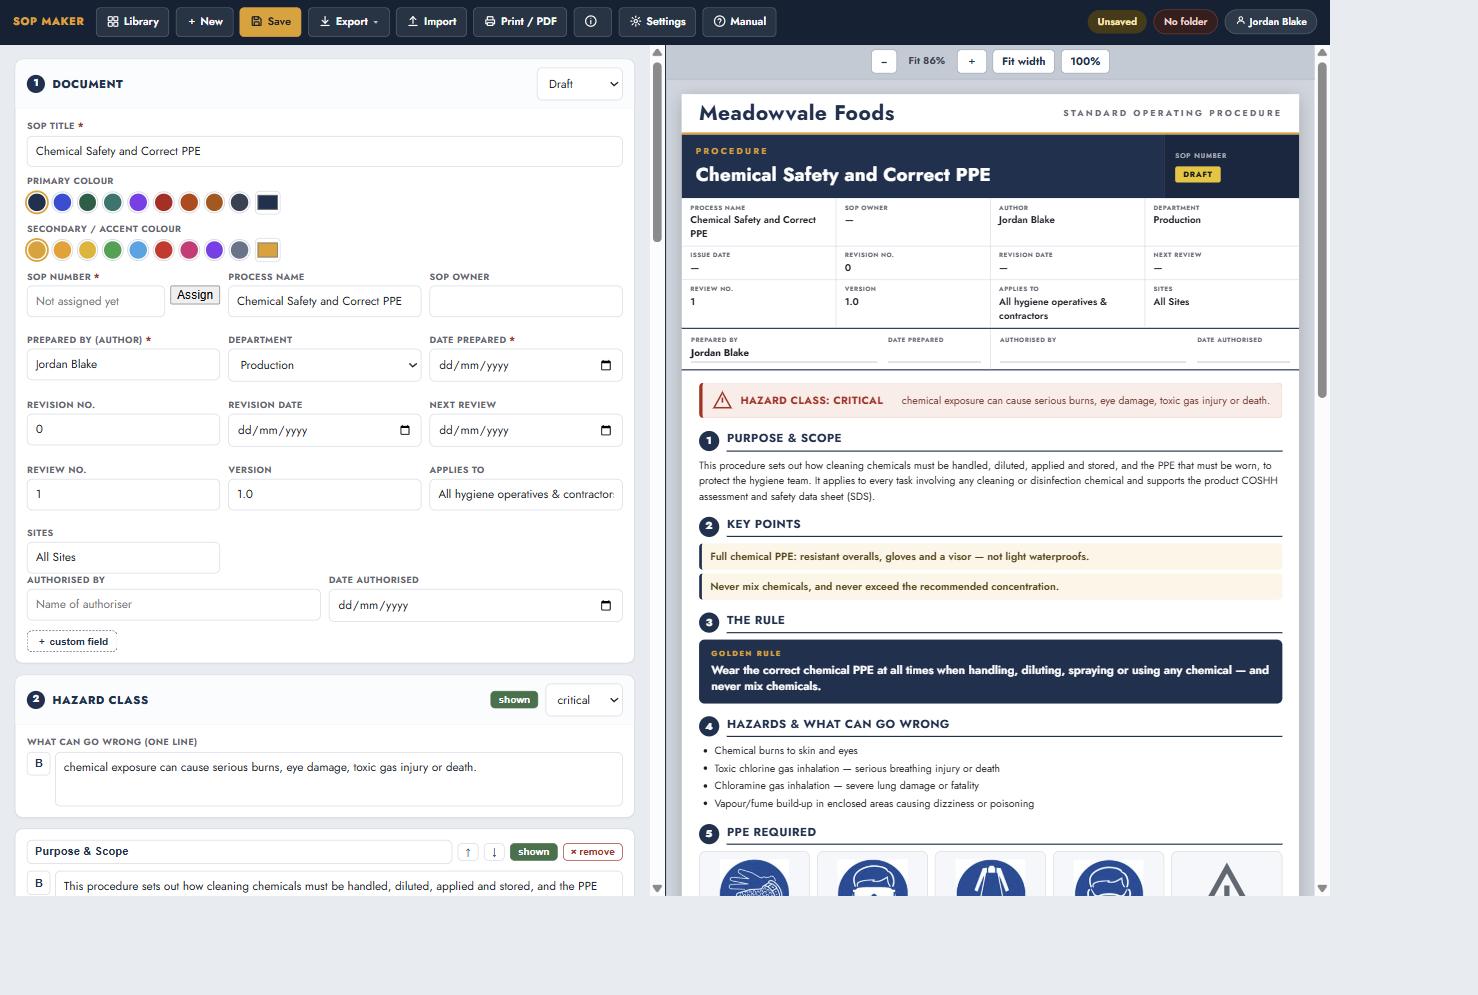
An SOP is made of two parts:
- The document-control header. SOP title, owner, author, dates, revision, version, who it applies to and which sites it covers. This is the part auditors read first.
- The content blocks. Purpose, key points, the golden rule, the steps, PPE and a sign-off area.
Each SOP also carries a hazard class, so anyone reading it can see at a glance how careful they need to be.
When you are ready to give the document a number, click Assign. It fills in the next free number for the department you chose.
Saving your work
Click Save and SOP Maker writes two things at once:
- The editable source. This is the master copy of your SOP, kept safe in
02_JSON/Libraryas one file per SOP. - The printable page. A finished, print-ready page saved in
04_Exports/<your department>/HTML.
The source is the master copy and is never overwritten by another SOP, so your work cannot be lost to a numbering clash.
Sign-in required: you enter your name once so every SOP records who wrote it. This is part of keeping the documents controlled and traceable.
Working on a shared drive
If your folder sits on a shared drive, more than one person can have the same SOP open. Before it writes, SOP Maker re-reads the file on disk and compares it with the version you opened. If a colleague has saved in between, it stops and asks you what to do rather than replacing their work without saying so.
Whenever a save replaces an existing version — whether or not you were asked — the version being replaced is copied into 02_JSON/Library/_bak first, so an overwrite can be undone by hand. The last few copies of each SOP are kept there. If you answer Cancel, nothing is written at all, so there is no backup to look for and none is needed.
That check has a limit worth knowing, and it is worth knowing precisely. If two people on two different computers press Save in the same instant — close enough that each one's check finishes before the other's write lands — neither save can see the other in time, and the later one is the version left on disk. In that one case the _bak copy does not hold the overwritten work either: both computers read the same version before writing, so both back up that same version. What you are left with is the 07_Log history, which will show you that both saves happened and who made them, but not the lost text. No browser can lock a file on a shared drive, so this is a limit of the platform rather than a fault. Within a single browser profile on one computer it is different: saves are queued and cannot overlap, even with the app open in two tabs. The queue is scoped to the browser profile, not to the machine — two Chrome profiles, or Chrome and Edge side by side, do not share it and behave like two computers. If several people edit the same procedures regularly, agree who owns which department — that, rather than the check, is what actually prevents this.
Who changed what
Every save also writes a history entry into 07_Log, in a folder named after the SOP's own id — one small file per save, holding the date and time, the name and role signed in, the action and the save's own revision counter, and the SOP’s id, number, version, revision number, status and title, plus the version of SOP Maker that wrote it — that is the whole record. The title is the only part of the document itself in there — no step content and no images. Entries are only added; an entry already written is never changed or replaced, and none is ever deleted, so the history keeps growing for as long as you keep the folder. When an auditor asks who changed a procedure and when, that folder is the answer.
The SOP Library
The Library lists every SOP you have saved, grouped by department. It is where you go to find, open and update your documents.
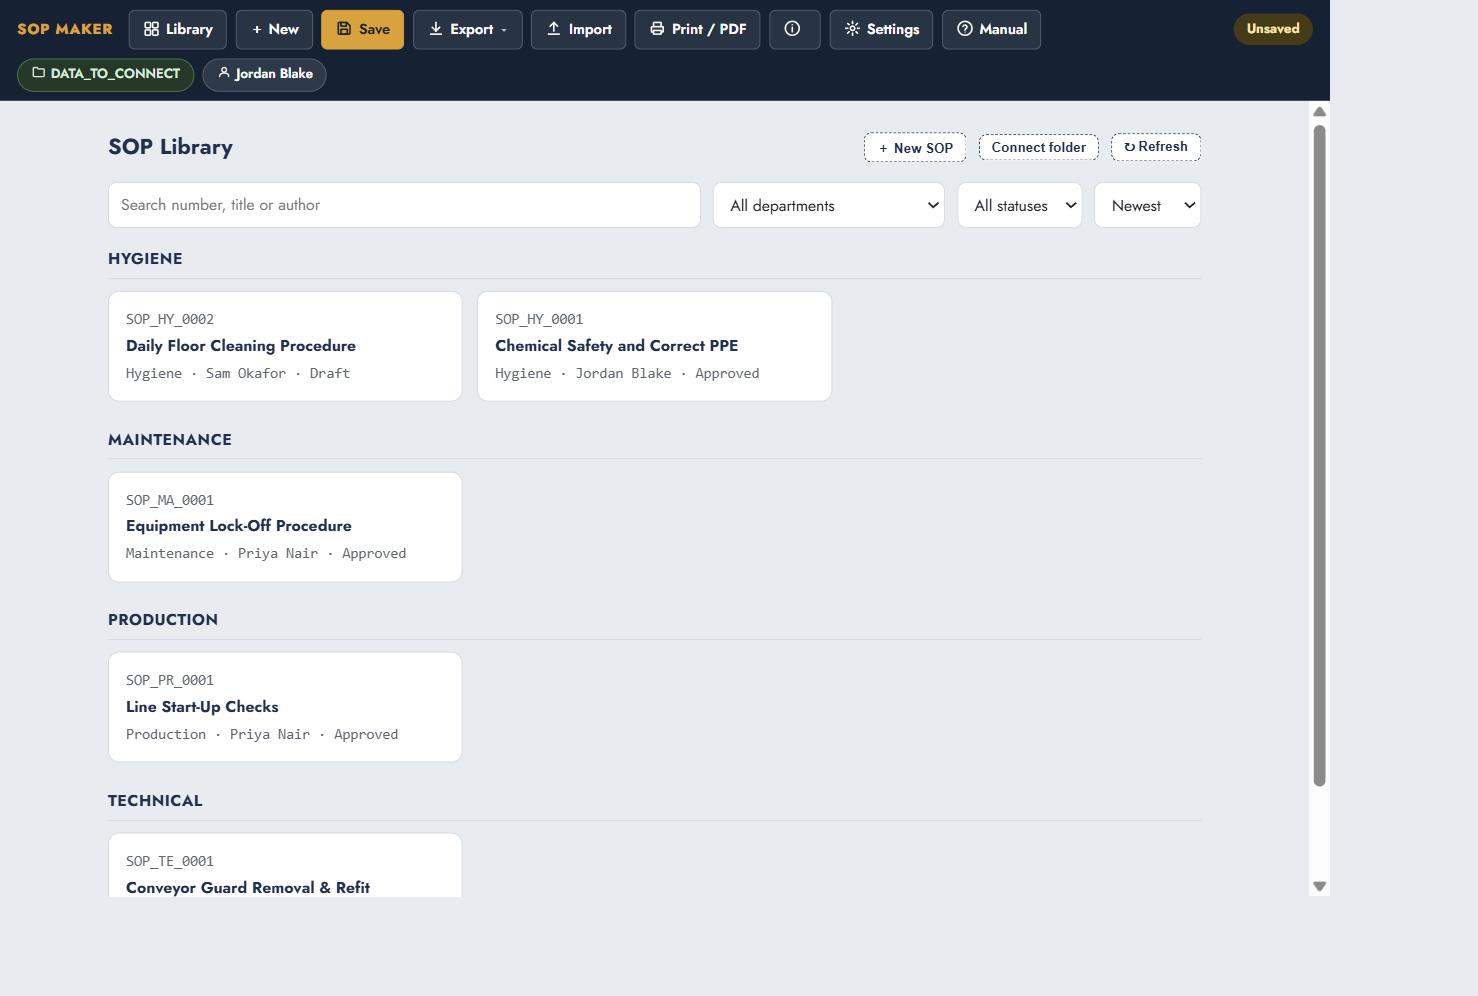
- Search by number, title or author.
- Filter by department or status.
- Sort by date, number, title or author.
Saving overwrites the same files, so you always have one clean master copy per document. If two SOPs ever end up with the same number, the Library flags it so you can renumber one.
What each card can do
Every card carries its own buttons. The card itself is not a button — an SOP opens when you click Edit, not when you click the card.
- Edit — open this SOP and work on it.
- Duplicate — start a new SOP from this one. See Reusing an SOP as a template.
- Copy to Unverified — take a copy out of the numbering system so you can give it a number of your own. See SOPs that already have a number.
- Make as Template — turn this SOP into a starter that appears in the New-document list. See below.
- Rename — change the title without opening the document. The SOP number does not change.
- Delete — move this SOP out of the Library. See Deleting and restoring an SOP.
Making a starter template
Make as Template saves the shape of an SOP into your folder, under 01_Templates/sop-templates, so it shows up as a choice whenever anyone creates a new document. Use it when the same kind of procedure comes up again and again: write one good one, and start from that every time.
A starter carries the content — sections, wording, hazard box, PPE tiles, sign-off columns. It does not carry the SOP number, or the "Authorised by" name and date. Every document made from it gets its own new file, so two people working from one starter can never overwrite each other. Give the starter a name and a short description so the next person knows when to reach for it.
Reusing an SOP as a template
Once you have written one good SOP, the next one in the same shape is mostly the same document. Duplicate, on every Library card, starts a new SOP from an existing one. Your own approved procedures become your best templates, and they beat any starter template because they already use your wording, your departments and your PPE.
Everything that makes the document useful comes across: all the sections and their content, the hazard box, the PPE tiles, the sign-off columns, your custom document-control fields, the department and the format.
Four things are deliberately left behind. The copy arrives as a Draft, with no SOP number, no issue date, and the built-in authorisation cleared — that is the "Authorised by" name and date.
That last one matters more than it looks. The name of whoever authorised a procedure is printed on the document. If a copy kept it, you would hand out a new procedure carrying someone's authorisation for something they have never read. So the copy starts unapproved, and someone has to authorise it properly — which is the whole point of a controlled document.
One thing to watch. Custom fields carry over, because they are usually content worth keeping — "Line: 3", "Shift pattern", and so on. If you use a custom field for an approval of your own, such as "QA approved by" or "Approval reference", the tool does not know that is an approval and will copy it across. Clear it yourself on the copy.
The original is not touched. Nothing is written to your folder until you save the copy, and when you do, it is saved as a new document with its own number. Give it a title, fill in the dates, change what needs changing, and send it for approval as normal.
- Open the Library.
- Find the SOP you want to work from and click Duplicate on its card.
- The copy opens in the editor, titled the same with "(copy)" on the end.
- Rename it, edit it, then Save. It is given the next free number for its department.
Deleting and restoring an SOP
Delete on a Library card takes an SOP out of the Library. It does not shred anything. The document is moved into an _archived folder inside the Library, where you can still find it, and the Library's Archived view lists everything that has been deleted, with Restore beside each one.
The number is not released. If you delete SOP_HY_0007, the next new hygiene SOP is still numbered 0008. Numbers are not re-used, so one that has already been printed or signed off can never turn up later on a different procedure. If you want the document back, restore it — that gives you the same number again.
Deleting writes a safety copy first, then copies the record to its new home, reads it back to check it arrived whole, and only then removes the original. If anything goes wrong in the middle, the document stays where it was and SOP Maker says so.
SOPs that already have a number
Not every procedure starts life in SOP Maker. Most places already have paper procedures with numbers of their own — HYG/003/A, 003-A rev B, Machine 12 — and when you rebuild one of those, its number has to stay exactly as it is. The number is already on the printed copy, and probably referenced elsewhere in your paperwork.
That is what Unverified is for. When you create a new document, tick Unverified, and the SOP number becomes a box you type into rather than a number the tool hands out. These documents live in their own folder, 05_Unverified, and are listed under their own heading in the Library.
They print exactly like any other SOP. No watermark, no "unverified" stamp, nothing extra on the page.
Two rules keep the two sets of numbers from colliding:
- No two unverified documents may share a number and a title. If you try, SOP Maker names the one that already has it.
- SOP Maker will not accept a number in its own format —
SOP_HY_0007and the like. Those belong to the tool's own counter, and a hand-typed one would sooner or later clash with one the tool hands out. Your old paper numbers are unaffected: they do not look like that.
Copy to Unverified, on any Library card, makes an unverified copy of a numbered SOP — useful when a document needs to go out under a number from somewhere else. The original is untouched.
Printing and saving as PDF
SOP Maker saves a print-ready HTML page for every SOP. To turn that into a PDF, use your browser's own print dialog.
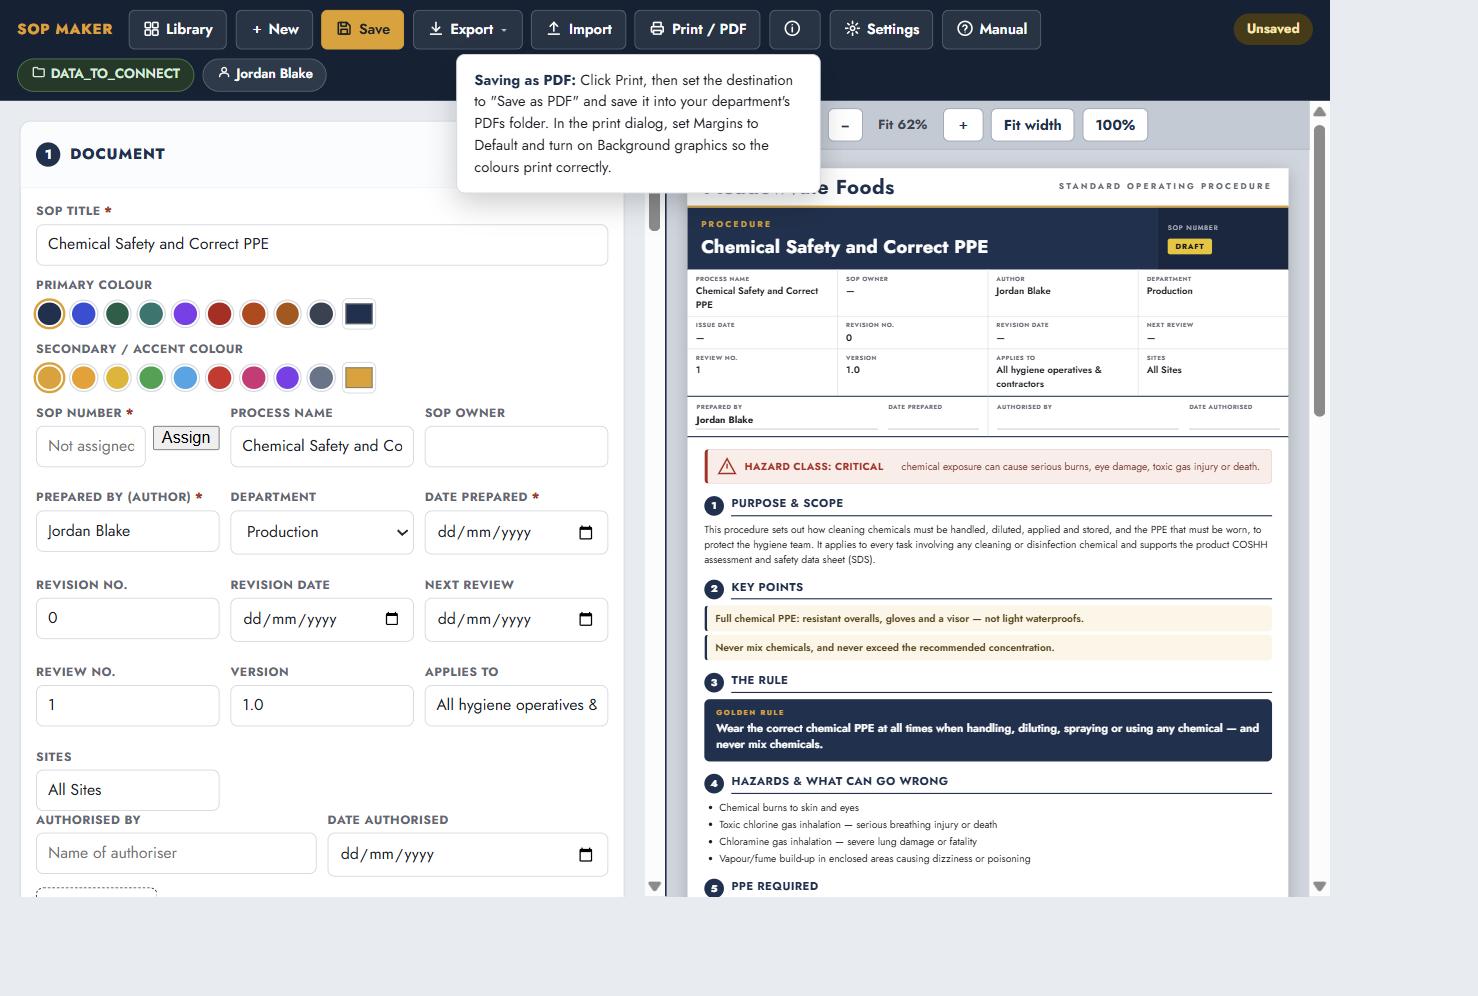
- Click Print / PDF.
- In the destination box, choose Save as PDF.
- Set Margins to Default.
- Turn on Background graphics so the colours print correctly.
- Save the file into your department's PDFs folder.
Every printed page carries the SOP number, the title and a "Page N of M" footer, so loose pages are easy to put back in order.
What's in the folder
Your DATA_TO_CONNECT folder holds everything SOP Maker uses. You rarely need to open it by hand, but it helps to know what is where:
01_Templates— your departments, sites, equipment lists and starter templates. These are editable files.02_JSON/Library— the master copy of every SOP.02_JSON/Library/_bak— a copy of the previous version of a document, written just before it is replaced.02_JSON/Settings— your company details and branding.03_Images-Icones— the icon set: 158 SVG drawings covering PPE, cleaning tools, controls, chemicals and chemical-safety symbols, plus any equipment photos you add.04_Exports/<department>/HTML— the print-ready SOPs.04_Exports/<department>/PDFs— where you save your own PDFs.07_Log— the history of who saved which SOP, and when.
Keeping your data safe
The master copy of every SOP lives in 02_JSON/Library. That one folder is the thing to protect.
- Back it up: copy it somewhere, or keep the whole
DATA_TO_CONNECTfolder on a drive that is already backed up. - The printable HTML can always be re-made from the master copy, so the Library folder is what really matters.
- Keep
02_JSON/Library/_bakand07_Login the backup too. Both are small, and they are what lets you answer "who changed this, and what did it say before?". - Nothing is sent anywhere. The tool makes no internet calls with your documents.
Troubleshooting
Why can't SOP Maker connect to a folder?
You are most likely in a browser or device that does not support the folder feature. Use Google Chrome or Microsoft Edge on a computer.
Why does SOP Maker ask for folder permission every time?
This is normal. Click Allow. Your files are not lost; the browser is simply re-connecting to the folder you already chose.
Can I save an SOP as a template?
Two ways, and which one you want depends on how often you need it. For a one-off, click Duplicate on any Library card: you get a fresh Draft with all the content and none of the numbering or authorisation. For something you will start from again and again, click Make as Template — that saves a starter into your folder and it appears in the list whenever anyone creates a new document. See Reusing an SOP as a template and Making a starter template.
I deleted an SOP by mistake — is it gone?
No. Delete moves the document into the Library's Archived view, where Restore brings it straight back. See Deleting and restoring an SOP.
Can I keep the number my old paper SOP already has?
Yes — tick Unverified when you create the document and type the number the original carries. It prints exactly like any other SOP. See SOPs that already have a number.
What do I do if two SOPs have the same number?
Open one of the two documents and use Assign to give it a fresh number. The Library will stop flagging it once the numbers are unique.
Can I use SOP Maker on a phone or tablet?
Phones and tablets can view and print an SOP, but they cannot author or save one. Switch to a computer running Chrome or Edge to create and edit documents.